Ready to “kill your lawn” and move on? So are we. When it comes to lawn removal, the hardest part may not be getting started, but deciding which method of removal is best for your project is an easy first step. Whether you're looking to replace your lawn with a water-wise garden or simply seeking to refresh your landscape, choosing the right technique can make all the difference in achieving desired results efficiently and effectively.
There are several popular techniques for removing a lawn each with their own pros and cons. MEADOWS IN A BOX did the research for you and put together a list of FAQ’s and comparison for the most popular methods.
How important is a clean slate?
The short answer? It depends on what you plan to install after removing your lawn, but proper site prep is key to a successful landscape project.
Complete removal of all plant material is obviously the ideal situation. It allows space for your new landscape to grow and establish, reduces resource competition, and reduces future weed maintenance. Particularly if the existing lawn is a rhizomatic species (Bermuda or St Augustine) and will continue to grow and spread from the smallest piece of root. However, for those of us who just want to replace the existing lawn with locally adapted and native grass species a complete scalping is not necessary as the new plants will out compete the existing lawn. Less labor and site prep is one of the benefits of choosing to convert traditional fescue lawn to a native meadow over rock gardens and perennials.
What are the most popular methods of lawn removal?
Currently there are 4 popular methods of sod removal: sod cutting, solarization, herbicide, and sheet mulching. Each has its own merits and ultimately the choice boils down to environmental philosophy and project deadlines. Solarization and sheet mulching are the accepted eco friendly options but take months to be effective. Sod cutting and herbicide are the least work and fastest methods of lawn removal. We compared the pro’s and con’s in the table below.

Steps for each technique
Solarization

Solarization of a lawn is a simple process that utilizes heat from the sun to naturally kill plant matter trapped under plastic. This method is perfect for places with long hot summers (average over 85 degrees F) and rhizomatic lawns. It can take up to two months to ensure all weed seeds and remaining grass roots are dead so plan accordingly.
First, start by mowing the lawn as short as possible to expose the soil. Next, thoroughly water the area. The additional moisture helps conduct heat more effectively and will aid in killing rhizomes. Then, cover the entire lawn with plastic sheeting (a dark color is best), ensuring it is tightly secured around the edges to trap heat and moisture. Leave the plastic in place for a minimum of 4 weeks during the hottest part of the summer. The extensive sunshine will heat the soil to lethal temperatures and kill the topsoil seed bank in addition to the existing grass. Periodically check the soil moisture levels and adjust watering if necessary to maintain optimal conditions. After the solarization period, remove the plastic and rake or scrape away the dead vegetation.
As with everything in life, there are both the pros and cons to consider:
- Environmentally friendly: Solarization eliminates the need for chemical herbicides, making it a non-toxic option for lawn removal.
- Cost-effective: It typically requires minimal investment beyond the cost of plastic sheeting, which is relatively inexpensive compared to other lawn removal methods.
- Natural process: Relies on the sun's heat to sterilize and prepare the soil, which can improve soil health by killing pests and diseases.
- Efficient weed control: Solarization can effectively kill a wide range of weeds, including seeds, rhizomes, and perennial roots
- Requires time and patience: Solarization usually takes 4 to 6 weeks during the hottest part of the summer, which may not fit everyone's timeline for lawn removal.
- Dependent on weather: Success depends on consistent sunlight and warm temperatures; cloudy or cooler weather can reduce its effectiveness.
- Not suitable for all climates: Areas with long periods of cloudy weather or cooler summers may not achieve the desired results.
- Temporary soil sterilization: While solarization kills existing vegetation, seeds and dormant weeds in deeper layers of soil may not be completely eradicated, necessitating additional control measures.
Sheet Mulching

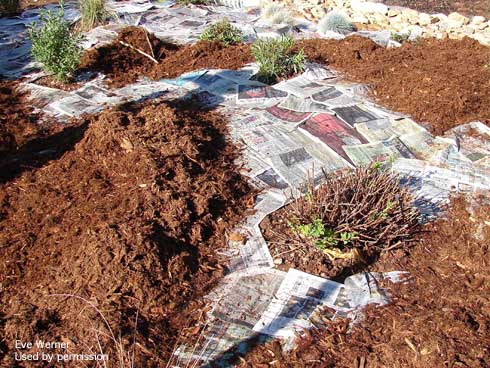
Sheet mulching is a method designed to smother the existing lawn and provide the additional nutritional benefits of composting. Consider it a ‘one stop’ site prep method. Perfect for patchy and fescue lawns. This method can take up to 6 months and requires temperate weather so plan accordingly.
First, mow the lawn close to the ground to reduce compost time and provide a clear working surface. Next, lay down a layer of cardboard or thick newspaper over the entire lawn area, overlapping the edges to prevent weeds from growing through. Wet the barrier layer thoroughly, this will aid in decomposition and create a seal. On top of the base, layer organic materials such as compost, mulch, and grass clippings to a depth of about 3-4 inches. These materials will smother the existing grass and begin the process of enriching the soil as they break down over time. It's important to keep the mulch layer consistently moist to aid decomposition and encourage microbial activity. After several months, the grass underneath should be completely decomposed, leaving behind an enriched planting space (hopefully weed free).
Sheet mulching also has its own set of pros and cons:
- Environmentally friendly: Sheet mulching reduces the need for chemical herbicides, promoting organic and sustainable gardening practices.
- Improves soil health: The layers of organic materials break down over time, enriching the soil with nutrients and improving its structure.
- Suppresses weeds: When done properly the thick layers of mulch and cardboard effectively smother existing grass and weeds, reducing future maintenance
- No heavy equipment required: Unlike some mechanical methods, sheet mulching can be done manually with basic gardening tools, making it accessible for most homeowners.
- No green waste: All of the plant material stays in place and when the prior lawn is composted successfully there is no need to create green waste or do additional labor beyond planting.
- Time-consuming: Sheet mulching typically requires several months for the materials to decompose and effectively kill the underlying vegetation, which may not fit everyone's timeline.
- Initial cost: While it can be cost-effective in the long run, purchasing enough cardboard, mulch, and compost for a large area can initially be more expensive than other methods.
- Labor intensive: Laying down carboard and mulching is labor intensive, requiring lifting, bending and kneeling
- Needs consistent maintenance: The mulch layer needs to be kept moist to facilitate decomposition, which may require regular watering, especially in dry climates.
- May not kill all perennial weeds: Some deep-rooted weeds may survive or reemerge through the mulch layers, necessitating additional control measures. Additionally, rhizomatic lawns may still re-emerge from soil disturbance associated with replanting the space.
- May create a permanent barrier: If the carboard layer is too thick or doesn’t decompose correctly it can create a barrier that prevents plant roots from becoming properly established and blocks soil gas exchange.
Herbicide

Herbicide is the general term for chemicals that kill plants. This method is effective and expedient but can be hazardous to the people and environment if the user is irresponsible and negligent. This process has the least time and labor involved and should be completed in the spring or fall while weeds are actively growing.
Always start with research before using chemicals. Chose one that will be effective on both your lawn and weeds. First thing, read the label and be familiar with manufacturer application instructions and proper protective equipment. Secondly, mow the lawn to a manageable height. Always follow the label instructions before applying herbicides. Apply the herbicide to your target vegetation and wait. Water the site and repeat the process weekly until no new vegetation emerges. Finally, simply rake to remove the dead vegetation and begin planting.
The pros and cons for this method are as follows:
- Effective weed control: Herbicides can quickly and effectively kill existing grass and weeds, including deep-rooted and stubborn species.
- Time-saving: Compared to manual methods like digging or solarizing, herbicides require less physical effort and can cover larger areas in a shorter time frame.
- Minimal disturbance: Herbicides can be applied with minimal disruption to the soil structure and underlying landscape features.
- Versatility: There are herbicides available for specific types of grasses and weeds, allowing for targeted control without affecting desired plants nearby.
- Can be used in various conditions: Herbicides can be applied in different weather conditions and seasons, although optimal results are often achieved during active growth periods.
-
Environmental concerns: Herbicides can pose risks to non-target plants, wildlife, and water sources if not applied correctly or if runoff occurs.
-
Health risks: Improper handling or application of herbicides can pose health risks to humans and pets, necessitating careful adherence to safety guidelines.
-
Resistance and rebound: Some weeds may develop resistance to certain herbicides over time, requiring rotation or combination with other control methods.
-
Regulatory restrictions: Herbicide use is often regulated, requiring certification or permits in some areas, and there may be restrictions on usage near water bodies or sensitive habitats.
Sod Cutting
 Sod cutting and tilling are mechanical methods of breaking up and removing a lawn. Mechanical methods require some site prep (checking for utilities lines and irrigation) but are best for time sensitive projects as the actual removal can be completed quickly.
Firstly, mark any utilities and irrigation lines to prevent damage during the cutting process. Clearly mark the areas you wish to remove and follow the instructions for operating the specific machine available. Cut the sod in over lapping lines, roll up the pieces and dispose of them according to your local green waste disposal policy. This method is simple and effective, especially for thick dense lawns. Sod cutting and tilling can also be combined with sheet mulching and solarization if disposal of the lawn is not an option. Simply flip over the cut pieces and cover.
Take a moment to go over the pros and cons of sod cutting:
- Efficiency: Sod cutters can quickly remove large areas of turf, making them suitable for projects requiring rapid removal.
- Minimal soil disturbance: Sod cutters cleanly lift the sod without extensively disrupting the underlying soil structure, making it easier to prepare for new landscaping.
- Versatility: Sod cutters can be adjusted to cut different depths, allowing for precise removal depending on the project's needs.
- Immediate results: Once the sod is cut and removed, the area is immediately ready for further landscaping or planting, reducing downtime.
- Less labor-intensive: Using a sod cutter requires less physical effort compared to manual methods like digging or hand removal.
-
Equipment cost and rental: Sod cutters can be expensive to purchase and may require renting if not used frequently, adding to project costs.
-
Limited to flat surfaces: Sod cutters are best suited for level or slightly sloped areas; they may not perform well on steep inclines or uneven terrain.
-
Disposal of sod: Proper disposal of the removed sod can be challenging and may require additional effort or cost, especially for large quantities.
-
Potential for soil compaction: Operating heavy machinery like a sod cutter can compact the soil, which may require remediation before planting new vegetation.
-
Noise and vibration: Sod cutters can be noisy and produce vibrations during operation, which may disturb neighbors or sensitive environments.
How do I know which lawn removal method is right for me?
Key factors to consider when choosing a lawn removal method: time, location, physical ability and budget. If you live in the sunny southwest any of these methods will work almost year-round. But if you live in a location with mild summers and early snow set a mechanical method of sod removal will be simpler and more successful. Unfortunately, there is not a foolproof guide to choosing the best method. From our experience we can say herbicides and sod cutting work well for effective and efficient site prep but such disruptive methods don’t align with everyone’s personal philosophies. After reading through the pros and cons table, you should have more clarity on which method to choose.


